Configure a local WordPress development on macOS from scratch
So you are a macOS user and you want to configure a local environment to build a WordPress project. Great choice, it is a fantastic piece of software! There are plenty of tools that let you set it up in no time at no cost — MAMP / XAMPP and Local by FlyWheel are probably the best choices for beginners. Smashing Magazine published an article called “WordPress Local Development For Beginners: From Setup To Deployment” by Nick Schäferhoff which is a great guide that takes you through the journey when using these kinds of tools. There is one disadvantage though — applications like these hide lots of important details from the user and come pre-bundled with lots of stuff that you just don’t need to run a WordPress website.
My approach is a little bit more complicated but gives you enough knowledge about the environment to walk away confidently. An Apache HTTP server, MySQL database and PHP programming language is all that we need and, believe it or not, your Apple computer comes with the majority of these elements baked in.
Configure an Apache HTTP server and enable PHP
The Apache HTTP Server and PHP language are already on your machine. You can confirm they are installed by checking the current version for each of them in the command line.
apachectl -v
php -v
Before we run the server we need to make a tiny adjustment in its configuration file. To do so, feel free to use your favourite text editor such as nano, vim, subl or my beloved code. Superuser privileges (sudo) will be needed.
sudo nano /etc/apache2/httpd.conf

This is the main Apache configuration file that contains tons of helpful comments about all the available directives. We need to proceed with a few tweaks here:
- Enable vhost
- Enable rewrites
- Enable PHP
- Change the default location for our projects
- Enable .htaccess
Enable vhost (Virtual Host)
There is a chance that you are going to work on multiple WordPress projects in the future and it would be cool to access them via custom domains (i.e. somewebsite.localhost or anotherone.localhost). Virtual Host is a term that describes exactly this functionality. To enable it uncomment LoadModule vhost_alias_module libexec/apache2/mod_vhost_alias.so and Include /private/etc/apache2/extra/httpd-vhosts.conf inside your Apache configuration file.
old: #LoadModule vhost_alias_module libexec/apache2/mod_vhost_alias.so
new: LoadModule vhost_alias_module libexec/apache2/mod_vhost_alias.so
old: #Include /private/etc/apache2/extra/httpd-vhosts.conf
new: Include /private/etc/apache2/extra/httpd-vhosts.conf
Enable rewrites
By default mod_rewrite follows the filesystem path. For example the URL to a page about your company may end up being mycompany.com/about.php. In the case of WordPress we will more likely see something like mycompany.com/?p=1. Wouldn’t it be cool to simplify it to mycompany.com/about? This is the reason why we need to explicitly enable it. Uncomment LoadModule rewrite_module libexec/apache2/mod_rewrite.so.
old: #LoadModule rewrite_module libexec/apache2/mod_rewrite.so
new: LoadModule rewrite_module libexec/apache2/mod_rewrite.so
Enable PHP
WordPress is written in PHP. That being so our server surely needs to know how to deal with .php files. It is as easy as uncommenting LoadModule php7_module libexec/apache2/libphp7.so.
old: #LoadModule php7_module libexec/apache2/libphp7.so
new: LoadModule php7_module libexec/apache2/libphp7.so
Change the default location for our projects
Personally I store the source files to all websites that I am working on inside a Sites folder in my home directory. It is not a requirement, just a convention. The default root directory for the Apache server is /Library/WebServer/Documents. We have to amend this path. Please, be sure to change the name of your username folder — the chances that your directory is called pawelgrzybek are slim!
old: DocumentRoot "/Library/WebServer/Documents"
old: <Directory "/Library/WebServer/Documents">
new: DocumentRoot "/Users/pawelgrzybek/Sites/"
new: <Directory "/Users/pawelgrzybek/Sites/">
Enable .htaccess
To easily change the server configuration on a per-directory basis, Apache uses .htaccess files. The AllowOverride controls section of the configuration file allows us to enable the use of .htaccess files. Edit the value of AllowOverride from None to All. We are done here!
old: AllowOverride None
new: AllowOverride All
Manage local domains using vhost
Do you remember vhost (Virtual Host) that we enabled second ago? We have to configure that in a way that our localhost serves files from ~/Sites and wp.localhost from ~/Sites/wp.localhost. We need to add a custom configuration to its configuration file that is located under /etc/apache2/extra/httpd-vhosts.conf. Open this file via the text editor of your choice.
sudo nano /etc/apache2/extra/httpd-vhosts.conf
This file comes with some example configuration that we don’t need. Feel free to comment it out or delete it. Add a configuration blocks that look like this (make sure that you have amended the paths accordingly to your username and domain):
<VirtualHost *:80>
    DocumentRoot "/Users/pawelgrzybek/Sites"
    ServerName localhost
    ErrorLog "/var/log/apache2/localhost-error_log"
</VirtualHost>

<VirtualHost *:80>
    DocumentRoot "/Users/pawelgrzybek/Sites/wp.localhost"
    ServerName wp.localhost
    ErrorLog "/var/log/apache2/wp.localhost-error_log"
</VirtualHost>
The DocumentRoot tells Apache which directory the domain specified under the ServerName should be pointing to. The ErrorLog enables any error log files for this website (this may be helpful for debugging in the future). If you need to set up extra domains, simply duplicate one of those blocks and amend domain and path accordingly.
Start, stop, restart and test apache server config
I know it is a little bit daunting but I promise that we’ll never come back to this nasty lengthy configuration file again. Four simple commands are everything that we need to remember from now on. Start, stop, restart and configuration test.
sudo apachectl start
sudo apachectl stop
sudo apachectl restart
sudo apachectl configtest
Hopefully the commands are self-explanatory. Please bare in mind that every single change of the Apache configuration files require rebooting of the server. A good practice is to run a sanity check beforehand by executing sudo apachectl configtest. If you get Syntax OK feel free to run the server using sudo apachectl start.
Test time! Now let’s create a test index.php file in the ~/Sites as we specified in vhost config file. Put a <?php phpinfo(); in there please. If you followed my previous instructions carefully, this is what you should see under http://localhost/.

Point localhost domains to 127.0.0.1
Every time when you visit a website your browser asks a DNS server for the IP address to redirect the request to. DNS server is like a massive phone book that maps domain names to IP numbers.
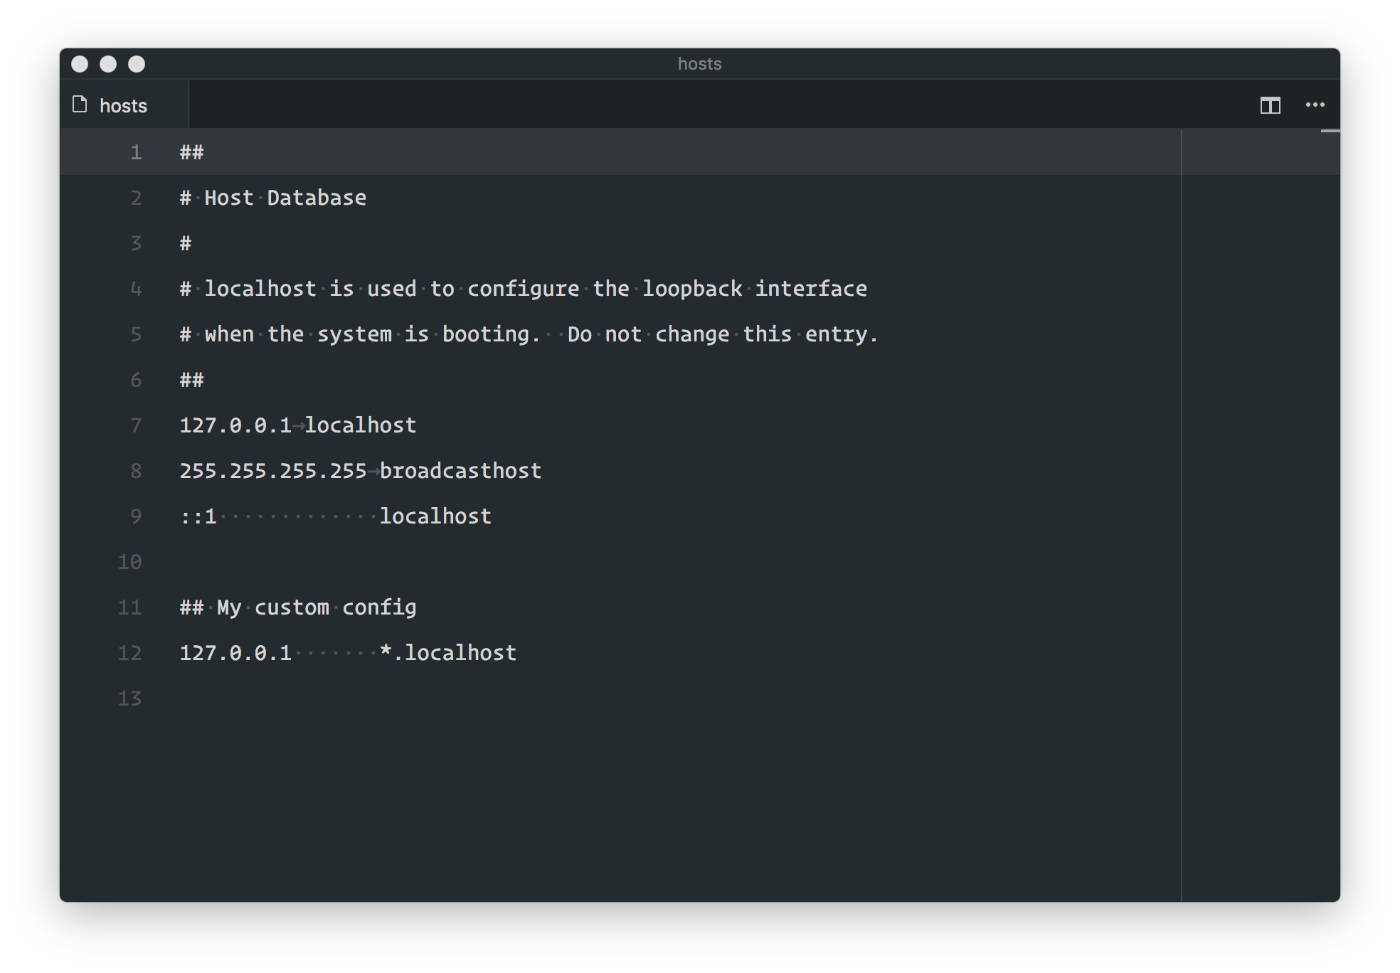
My convention is to use .localhost as a domain suffix for locally stored websites. We don’t want those domains to go to the DNS Server to ask for an IP number because we already know it – it is the IP of our own computer — 127.0.0.1 (“localhost” in other words). A hosts file helps us with it — you can think of it as a local DNS directory. Add 127.0.0.1 *.localhost to this file — it is located under /etc/hosts.
sudo nano /etc/hosts
MySQL to store data, Sequel Pro to manage it
WordPress’ mission is to edit and serve content stored in a database which is the last missing piece of our setup. In order to download the database software and a great GUI (graphical user interface) for it, we are going to use Homebrew — the missing package manager for macOS. If you are not a Homebrew user, please follow the installation steps from the website and take my word that it is going to make your life much easier in the future. I published “Homebrew — the best friend of the macOS user” where I elaborate more about benefits of using it.
brew install mysql
brew cask install sequel-pro
MySQL has been installed and root user with blank password has been added. Since version 8 it uses a different method of password encoding. To make our life easier we should change this encoding for our pre-created user. Log into MySQL shell using mysql -u root, change a password encoding using ALTER USER 'root'@'localhost' IDENTIFIED WITH mysql_native_password BY ''; and exit shell using exit;.

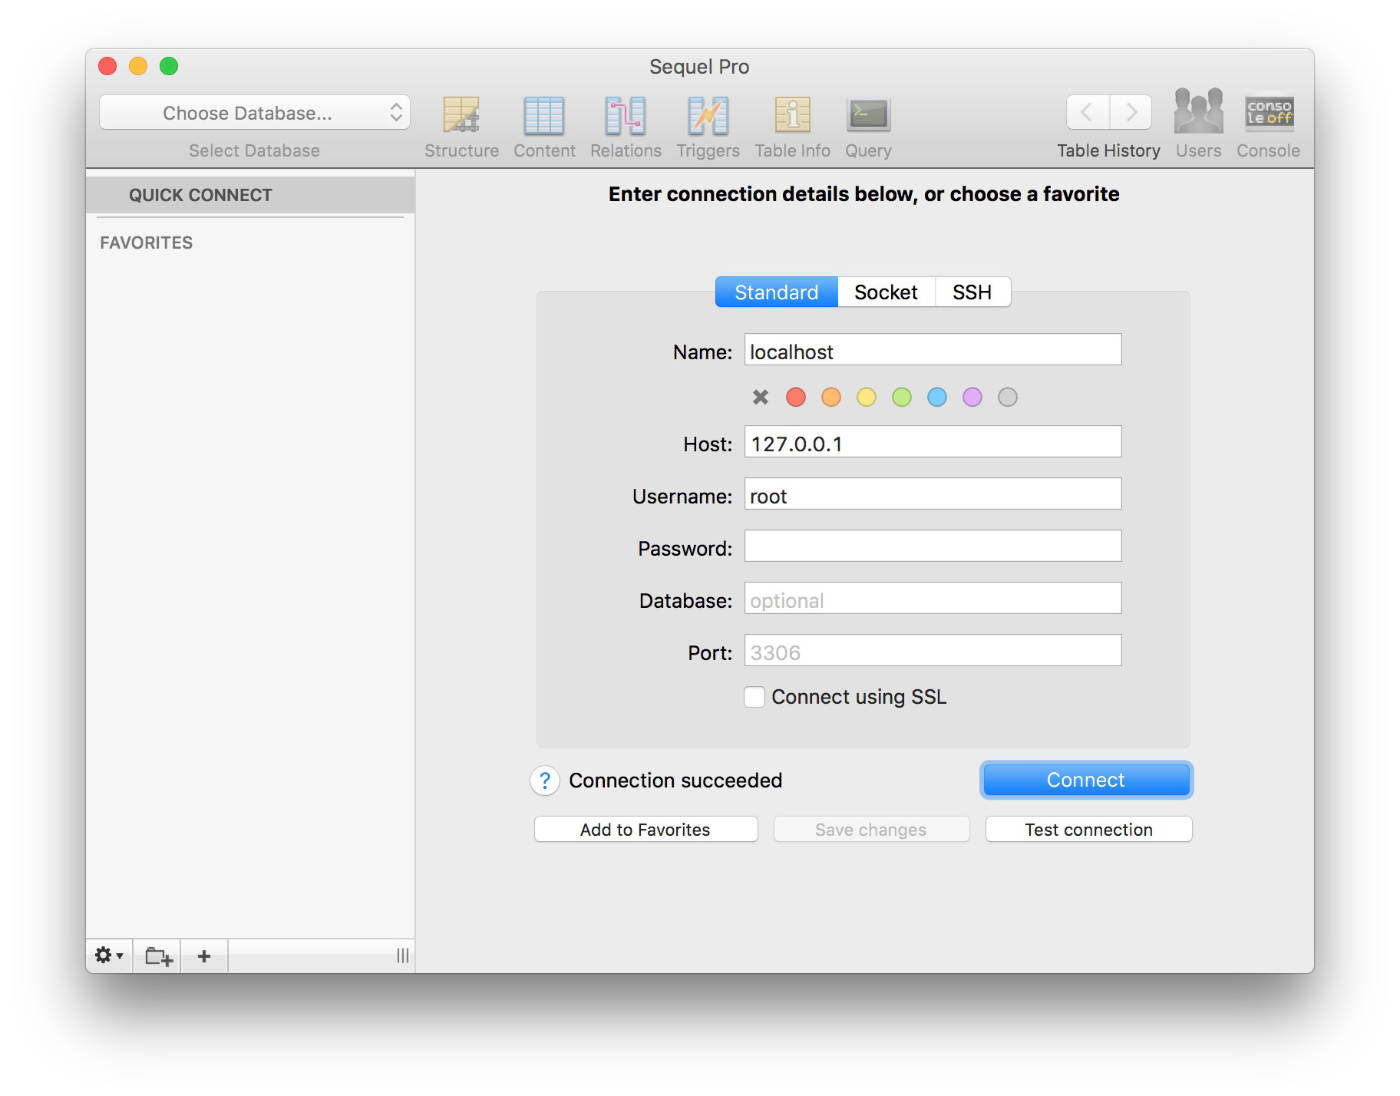
Now you have everything that you need. Run a mysql.server start command to initialise a MySQL daemon and launch Sequel Pro app to create the first database that we are going to use on our website later on. On the initial screen use a descriptive name for your connection, 127.0.0.1 as a host, root as a username, keep the password blank and hit the “Connect” button.
Are you in? From the dropdown in the top-left corner pick “Add database…”, give it a meaningful name (I always follow the convention: localhost_nameofawebsite), confirm and you are done.
Build a WordPress website via WP-CLI
If you are working a lot with WordPress but you don’t use the Command line interface for WordPress you need to re-evaluate your workflow. Seriously! There is no other way to save yourself more time than this. If you don’t have it yet, install it via brew (I told you second ago that the Homebrew is amazing).
brew install wp-cli
Time to build out a new website! Let’s call it wp.localhost. It was common practice to use .dev as a development domain but a few browser vendors made this a little bit more complicated by requiring an SSL certificate for all .dev domains. To avoid the additional steps required to configure it, change your habits and use .local, .test or .localhost instead.
mkdir ~/Sites/wp.localhost && cd ~/Sites/wp.localhost
wp core download
wp config create --dbname=NAME_OF_YOUR_DATABASE --dbuser=root --dbpass= --dbhost=127.0.0.1
These few lines create a folder wp.localhost inside a Sites directory, download all the WordPress core files into it, creates a wp-config.php file and fills all the necessary details for you. Nice, isn’t it? Time to check if everything is working as expected.

Helpful tip
As a front end developer, the majority of the time I use some node-based servers for my local environment. I rarely build WordPress projects so there is no need for me to keep Apache and MySQL always running in a background. I created two quick bash aliases that enable / disable those tools for me in a blink of an eye. If you like my approach, add it to your .bash_profile file.
# start / stop Apache & MySQL
alias am-start="sudo apachectl start && mysql.server start"
alias am-stop="sudo apachectl stop && mysql.server stop"
Enjoy WordPressing
Voilà! We ended up with a robust local environment for your WordPress development. You can easily run other frameworks like Laravel on this setup with ease. I hope that you found this article helpful.
I almost forgot! Thanks a ton for proofreading to Marcin Krzemiński who gave me lots of great advices how to make this article better. I highly advice this dude for any WordPress related stuff — he knows his craft!
Until next time!
Hey. Happy to help ;).
P.S. It's WordPress not Wordpress 😜
All instances corrected. Thanks again Marcin!
Sweet 🥑
Thanks for this. I had a problem with apache not running. When I ran the configtest it kept saying - AH00112: Warning: DocumentRoot [/usr/docs/dummy-host.example.com] does not existAH00112: Warning: DocumentRoot [/usr/docs/dummy-host2.example.com] does not exist
Syntax OK.
After much googling and messing around eventually I found this reference in the httpd-vhosts.conf file in apache2/extra folder.
It worked once I replaced
DocumentRoot "/usr/docs/dummy-host.example.com"
with
DocumentRoot "/Users/myusername/Sites"
- Perhaps add this to the above
Hi.
I updated this article.
Current version of Apache comes with some example config added to httpd-vhosts.conf. That was the main issue that you experienced. Simply delete the dummy config and replace with your own one.
Thanks again for pointing it out in a comments.
If you have issues with Sequel Pro not connecting to your HomeBrew mysql install see https://stackoverflow.com/q...
Great tip!
Yeah, I've got that issue. I understand it's a new type of password and sequel pro isn't updated. The problem as that those SO threads are full of questions about that my.cnf, and where it is and no one seems to know. Some say that homebrew mysql has some default examples, but mine doesn't, can't find that one helpful and correct and current post from all the chaff
I will revisit this article at some point and update all missing / confusing info.
Hi.
I updated this article.
You don't need to update my.cnf file to use a different password encoding for particular user. Simply alter it using MySQL shell.
I updated article accordingly.
Thanks again for pointing it out in a comments.
Hi.
I updated this article.
This is related with a different password encoding enabled in MySQL in version 8. I updated this article with a one liner solution for this issue.
This simple MySQL shell command enforces an old way of password encoding. This fixes the issue with a database access.
Thanks again for pointing it out in a comments.
Hi there,
This is awesome. Thank you.
I am stuck however at the http://localhost
I don't get the page you show, instead I get a access permissions message:
Forbidden
You don't have permission to access / on this server.
Hi.
Thanks for visiting my website!
Did you install this stuff via brew like I did? If not, try to manually change a permission of a directory where you store your files via `chmod` command.
Good luck 🥑
Yes. Installed using instructions here.
I can get to localhost if I add a port number localhost:8888
But Sequel Pro won't connect it times out.
Did you try to manually tweak a permission to your root folder?
No. But I did find on another site a suggestion to use MAMP.
It’s all working now.
Thanks for your prompt assistance.
Nagui
Hi.
I updated this article. I provide more detailed instructions that prevent the situation that you ended up in. Hopefully it will help you out in the future.
Thanks again for pointing it out in a comments.
Hello,
Thanks for this wonderful article.
Just a remark, wildcard is not allowed in /etc/hosts file (127.0.0.1 *.localhost)
I had to explicitely put my website adress.
Alexis
Thanks for pointing it out. I am sure it may be helpful for some people later on landing on this article.
Hi, thanks for the article.
I was excited to see that wildcards in /etc/hosts was working for you but I can't make it work and I can't find any evidence online that this is working for anyone else.
Do you have dnsmasq or something else installed?
Nope man, pretty standard setup. Literally the only things that I did to make it work are all the changes described in this article.
I'm on a stock 10.14.3 and it looks to me like the * is interpreted literally. Any thoughts?
https://www.dropbox.com/s/b...
Hi.
I revisited this article to update it a little bit. Wildcard in hosts file is working for me as expected. I am not entirely sure what is the reason it is not working for you.
Thanks for this simple and straightforward instruction. I got stuck at the http://localhost a couple of times but it's all good after that's fixed. When I test with http://localhost, I first ran into 403 You don't have permission to access / on this server. After fix that by enabling <directory/>Require all granted</directory>, I then ran into a 404 error. That was fixed by change the apache2/extra/httpd-vhosts.conf file and replace the DocumentRoot with the directory of my own. So, in the end, my final set up was to leave out the steps "CHANGE THE DEFAULT LOCATION FOR OUR PROJECTS" and "ENABLE .HTACCESS", go straight to /etc/apache2/extra/httpd-vhosts.conf, edit the block to add the following info. Hope this will help others who might ran into the same issue. (For some reason the Directory "/Users/Yourusername/Sites" line was changed in the editor...)
Hi.
I updated this article.
Current version of Apache comes with some example config added to httpd-vhosts.conf. That was the main issue that you experienced. Simply delete the dummy config and replace with your own one. I updated article accordingly.
Thanks again for pointing it out in a comments.
Thank you for your article, it has been a tremendous help. I have been searching for an answer online, but I can't find where I might have gone wrong. When I go to http://localhost/, I get "
I am more than happy to help. Can you give me a bit more details please?
Thank you.
1) I created a test index.php file
2). I put
Is your message completed?
Everything works great, except that I cannot install plugins, permission error and I cannot find a solution. Any idea?
This one should be easy to fix. You have to change permission on `wp-content` folder and everything should be working fine :)
how about using Sudo Chown -R user /Users/Sites/WP
to add a user to it
I had a similar issue with permissions, so I thought I'd write down what worked for me.
My problem was that httpd was running as a different user and group than who owned the sites directory.
First, run in the command line:
idThat will show you the uid and gid - note their values in parantheses.
Then:
sudo nano edit /etc/apache2/httpd.confFind where it says:
User _www
Group _www
..and replace
_wwwwith the uid and gid values respectively.Restart Apache:
sudo apachectl restartHope that helps!
Thanks for help on this one! Hopefully it helped you out @kevinmamaqi:disqus
this will not work if you still have sessions, so you also need to do another step.
open terminal and:
sudo chown [user]: /var/tmp/sess_*replace [user] with your username
now it should work
This article of yours is really very informative. Even someone with just a little to basic programming knowledge can understand and follow it. Thanks for sharing useful information!! I am really impressed to see that you have provided such an interesting information about WordPress.
Anyways can you suggest me some better option to get Cheap Linux hosting other than redserverhost.com?
Thank you once again!!
Huge help! Thanks for this.
I'm having trouble with the ~/Sites folder. I've gone through the entire tutorial successfully, but the phpinfo() page only shows if the index.php file is placed in the /Library/WebServer/Documents.
This also leads to an error when visitng wp.localhost in the browser. The browser 'cannot find that site'...I assume because it's not looking in the ~/Sites where it is installed.
Any ideas?
Hi.
I updated this article some time ago and everything was working just fine. I am sorry that it doesn't for you. It is kina hard to debug for me :(
The only thing that I can recommend at this point is new article that I published very recently about using Docker for WP development. It is very easy to follow and extremely replicable.
https://pawelgrzybek.com/co...
Hopefully that helps.
This is such a great article and helped me setup a local environment pretty quickly, thanks so much for sharing!
Question: I know you mentioned early in the article about setting up the vhosts for multiple projects, with each local project you setup are you updating the httpd-vhosts.conf file for each project?
What I would love to do would be able to setup multiple project directories in
/Sitesand just have that file automatically know to read each directory. So say I have/project-one,/project-twoand/project-threedirectories in Sites, it would automatically use their directory names to run as/project-one.localhostetc etc...Hi.
I have no clue how to set it up that way — I am not an expert. I am not even a fan — I try to avoid these config files as much as I can.
I am happy that my article helped you out.
This is awesome. Have you considered adding a section on ftp so that plugins and updates can be done using the wordpress UI?
I've followed every step but I cannot get the .htaccess file to be respected, in as much as when I change the wp permalinks section I see updates to my .htacess file, but the bigger upload limit settings I have added as well are ignored
Great point here my friend. I may need to revisit this article and find a reliable piece of config that will let you do it. I will try to update it and I will let you know about my findings.
You may also have a look at this article, where I explain step by step how to do prepare local dev env for WP using Docker. If I was on a WP project now, that would be my preferred way of setting up a local environment.
https://pawelgrzybek.com/co...
You're missing about two paragraphs after the brew mysql and sequel that involve things like actually starting the server before connecting to it.
Do you know what the user and permissions should be for the mysql directory and related files should be? I keep getting an error about updating the PID file.
ERROR! The server quit without updating PID file (/usr/local/var/mysql/Shanes-MBP.hitronhub.home.pid)
I mentioned this in this part.
https://pawelgrzybek.com/co...
Sorry I don't know about the permission. I would highly suggest checking my other article about spinning up Wordpress in Docker container. This is my preferred way nowadays.
https://pawelgrzybek.com/co...
not worrking when I run Duplicator. I get a:
Unable to connect the user [audiogiggles] to the host [localhost]. The server error response was: No such file or directory
If I change the host to 127.0.0.1 instead of localhost, I get slight different message:
Unable to connect the user [audiogiggles] to the host [127.0.0.1]. The server error response was: The server requested authentication method unknown to the client
I have followed this tutorial correctly, and authentication method for mysql was followed (mysql_native_password)
any idea what it could be?
cheers
*UPDATE
MYSQL 8.0.23 seems to have authentication method set per database.
When you create a new database in phpmyadmin, there is a new dropdown for authentication method, set it to native, which is set to that database only.
I generally followed your post and it was very helpful. (I do not work in technology): The things I found difficult, and that required more research were: (1) This command recommended by web site did not work: brew cask install sequel-pro
It gave me the following: Error: Unknown command: cask
I did a good search and found this command instead: brew install --cask sequel-pro
That seemed to work, and sequel-pro was installed.
(2) The database name wasn’t right I think I was being too “literal” and following this from your post:
wp config create --dbname=NAME_OF_YOUR_DATABASE --dbuser=root --dbpass= --dbhost=127.0.0.1
I was getting an error page when I tried to go to the WordPress Installation page. Something about the database "NAME_OF_YOUR_DATABASE" not existing. I went into the file “wp-config.php” and changed:
// ** MySQL settings - You can get this info from your web host ** // /** The name of the database for WordPress */ define( 'DB_NAME', 'NAME_OF_YOUR_DATABASE' );
To:
// ** MySQL settings - You can get this info from your web host ** // /** The name of the database for WordPress */ define( 'DB_NAME', 'localhost_myDataBaseName' );
(Where "localhost_myDataBaseName" was the name of the database I had created earlier in your process when dealing with the Sql Pro App.)
After that the Word Press Admin page came up, and all was well.
Thank you very much for your help.
Dean Cook deancooklawfirm@gmail.com
I am glad that you found it helpful Dean!
Great tutorial! I was able to install it all. When I put the index.php file in the folder "/Sites", Safari open it neatly when browsing "localhost". Brew and MySQL also nicely install and run.
However, the subdomain "wp.localhost" does not work when browsing in Safari.
When installing Wordpress through Brew, the folders are downloaded into the folder "Sites/wp.localhost", which means that I set those folders up correctly. However, the main folder is not accessible in Safari when browsing wp.localhost/wp-admin/install.php (or wp.localhost for that matter). Do you have any idea what I am doing wrong?
Otherwise a great tutorial, would love to drop MAMP once and for all.
I would highly suggest using at this one. I really don;'t think you need anything else than Docker to spin it up nowadays.
https://pawelgrzybek.com/configure-a-local-wordpress-development-using-docker/
command should now be (as of 2021) brew install --cask sequel-pro
I don't think that
--caskflag is still needed.For Monetery OS, please follow the following steps in addition to the steps in this document. https://www.simplified.guide/macos/apache-php-homebrew-codesign
This is very helpful clarification. Thank you so much.
Hey, thanks for the detailed article. I'm trying to set it up, but as other guys in the comment, I'm too stuck on the http://localhost/ part - with error message "Forbidden. You don't have permission to access this resource.Server unable to read htaccess file, denying access to be safe". Can you please help me try figure out what I did wrong? I followed the tutorial exactly step-by-step. Thanks.
Could you check what is your permission level on .htaccess file please?
Hi, I didn't create that file - do i need to do that? I thought that allowing it is enough. If not, where should I create it? Or if it exist, where is it located? Thank you very much for your quick response!
I think you need to create it manually and it should be located in the root of your host.